How to Control Hyphens in Microsoft Word
Quick Links
-
Hyphens vs. Dashes: What’s the Difference?
-
Using Manual and Automatic Hyphenation in Microsoft Word
-
Inserting Non-Breaking Hyphens in Microsoft Word
-
Controlling Hyphens via the Paragraph Dialog Box
-
Other Hyphenation Options
-
What to Do if Automatic Hyphenation Isn’t Working in Microsoft Word
You might have seen Microsoft Word’s Hyphenation tool but have never fully known how to use it. In this guide, I’ll explain what hyphens are, show you how to use them in Microsoft Word, cover some less-known hyphenation options, and offer some troubleshooting tips if they’re not working as expected.
Hyphens vs. Dashes: What’s the Difference?
Hyphens are short lines (approximately the width of a lowercase “i”) that join words together, such as in compound adjectives like “absent-minded” and “old-fashioned,” or compound nouns like “mother-in-law.”
They’re also used to link numbers together, like “fifty-seven,” and they sometimes join a word’s prefix to its root, like in “ex-president.” In Microsoft Word, alongside these uses and various others, they can be used at the end of a line to indicate that a word has been split across two lines, and this is the main focus of this guide.
Line-end hyphens help ensure a consistent layout by equalizing spaces between words, especially when applied to text with justified alignment. Also, if you’re working with narrow columns or have a page limit, hyphens are a great way to save space. That said, some readers might find that hyphenation breaks up the flow of the text, making it harder to read.

Related
What’s the Difference Between Em Dash, En Dash, and Hyphen?
So many lines. What do they all mean?
On the other hand, there are two types of dash: an em-dash, which is about the same width as a capital “M,” and an en-dash, which is about the width of a lowercase “n.”
Em-dashes are used to indicate a pause or break in a sentence, and they can also be placed at both ends of a clause to serve a similar purpose to parentheses. En-dashes are usually placed between numbers or dates to indicate a range.
If you’re writing for a publisher, an organization, or an academic institution, always check the style guide to see how and whether to use hyphens in your work.
Using Manual and Automatic Hyphenation in Microsoft Word
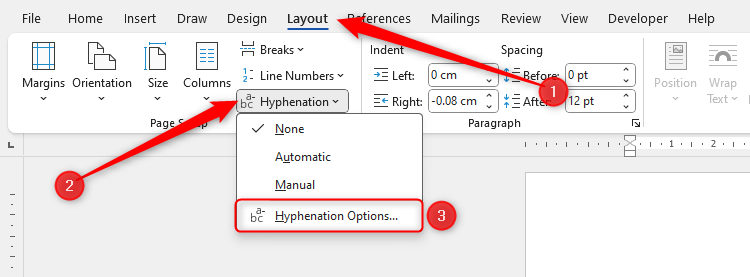
Microsoft Word’s manual and automatic hyphenation options both affect how the program deals with words at the ends of lines, and you can activate or deactivate them through the Hyphenation drop-down menu in the Layout tab on the ribbon.
By default, hyphenation is turned off in Microsoft Word.
Manual Hyphenation
Manual hyphenation is the best option if you want Microsoft Word to help you decide which words should be hyphenated.
Once you’ve finished typing all the text in your document, check “Manual Hyphenation” to launch a dialog box that suggests places where hyphens would either reduce the large gaps between words in justified alignment or at the end of lines in left alignment.
Here, each word that requires a hyphen will be split up into its individual syllables, and the recommended hyphen will flash black for your attention. You can either accept this recommendation by clicking “Yes” without making any changes, or select another hyphen in the word first.
After you click “Yes,” the hyphen will be added to your text instantly. Once you’ve finished reviewing all the recommendations, you can still add or remove hyphens manually if you wish.
If you want to add hyphens manually without Microsoft Word’s help, select “None” in the Hyphenation drop-down menu, and insert them manually using the Hyphen key (which, on most keyboards, sits between the 0 and +/= keys). As a rule, line-end hyphens should be placed at the ends of syllables (such as “hin-der,” rather than “hi-nder.”)
Automatic Hyphenation
Automatic hyphenation is ideal if you want Microsoft Word to take full control of your hyphenation, so you can concentrate on the quality of your content, rather than how it’s presented.
You can activate automatic hyphenation both as you type and after you’ve finished typing. However, it’s important to note that hyphens added through automatic hyphenation aren’t editable characters, meaning you can’t delete them manually using your keyboard.
Instead, to remove automatic hyphens, click “None” in the Hyphenation drop-down menu in the Layout tab—but remember, taking this step will remove all automatically added hyphens from your document.
Inserting Non-Breaking Hyphens in Microsoft Word
A non-breaking hyphen stops hyphenated units from being split across two lines.
For example, if you type a number containing two words separated by a hyphen towards the end of a line, Microsoft Word automatically uses the hyphen as a natural line break, meaning the number runs over onto a second line. In this example, “twenty-four-hour” being split across two lines is difficult to read and untidy.
Instead, adding non-breaking hyphens rather than regular hyphens between each word keeps them on one line.
To add a non-breaking hyphen in Microsoft Word, press Alt+Shift+Hyphen.
Controlling Hyphens via the Paragraph Dialog Box
While activating automatic or manual Hyphenation in Microsoft Word applies the setting to the whole document, you can choose to disable the feature for individual paragraphs or styles.
For example, you might have an academic document that contains lots of lengthy words, so you’ve decided that it’s best to enable automatic hyphenation. However, activating this setting means that the headings also hyphenate, and this is something you might prefer to avoid.
There are two ways to make this adjustment: changing the settings for the isolated paragraph or heading in the Paragraph dialog box, or modifying the relevant style.
Turning Off Hyphenation in a Single Paragraph or Heading
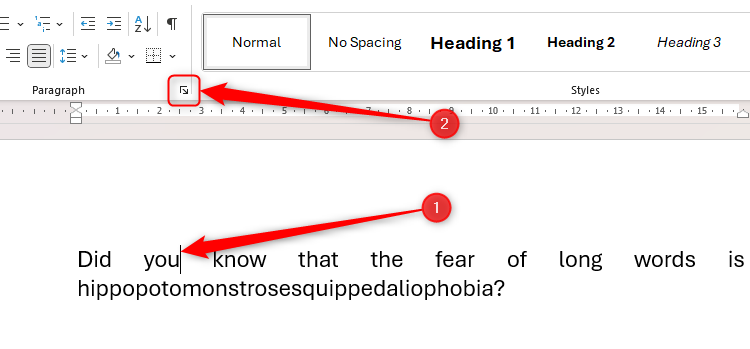
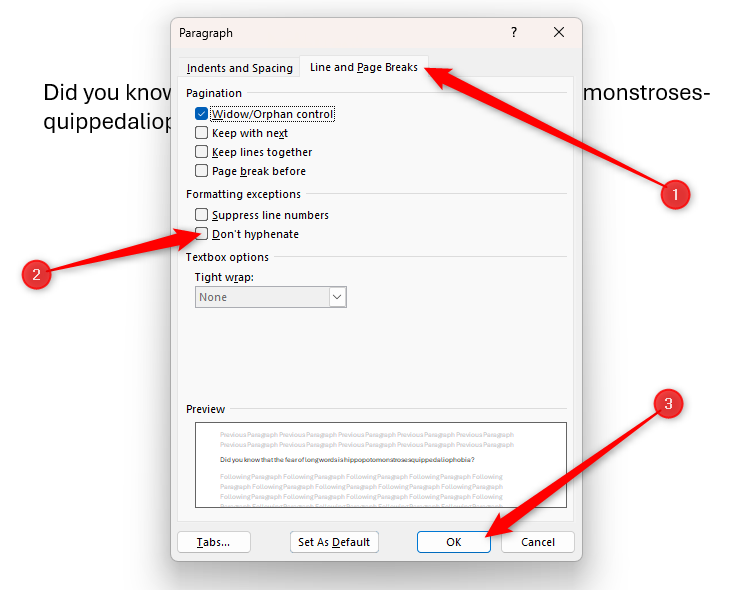
To prevent an individual paragraph or heading from hyphenating, place your cursor anywhere in the relevant text, and click the Paragraph Settings dialog box launcher button in the bottom-right corner of the Paragraph group in the Home tab on the ribbon.
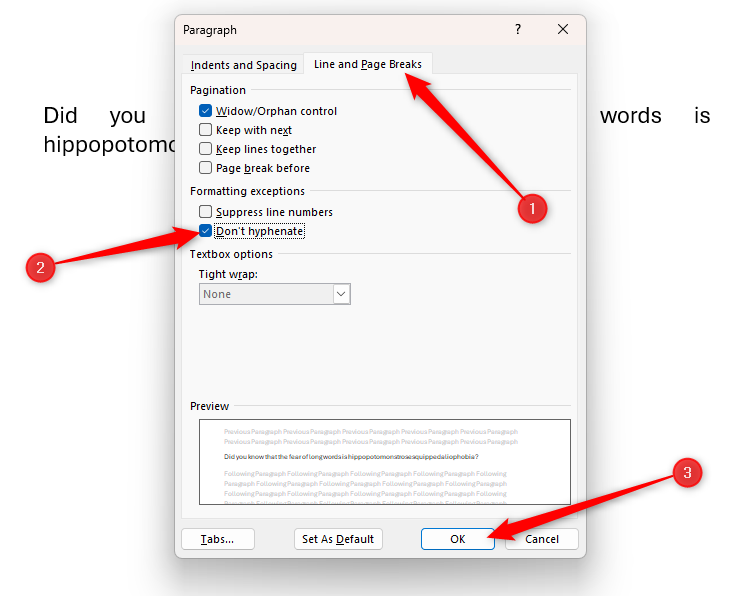
Now, in the Line And Page Breaks tab, check “Don’t Hyphenate,” and click “OK.”
Turning Off a Style’s Hyphenation
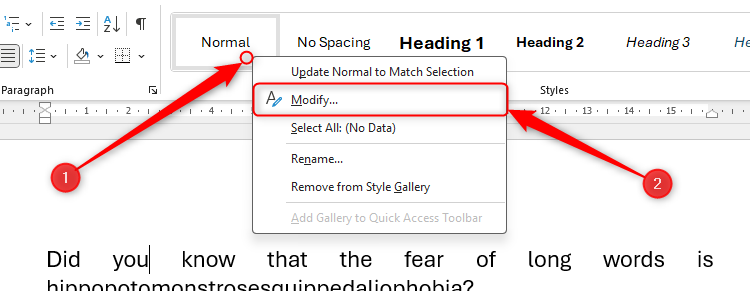
On the other hand, if you’ve formatted your document using styles, first, right-click the relevant style in the Style Gallery in the Home tab on the ribbon, and click “Modify.”
Related
Everything You Need to Know About Microsoft Word’s Styles
Every Word document should use styles.
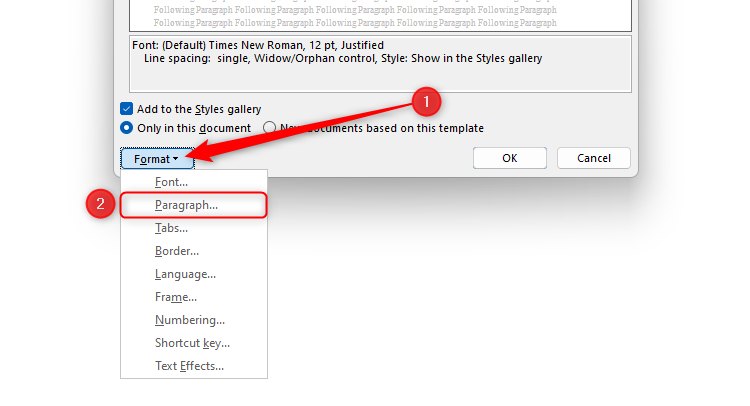
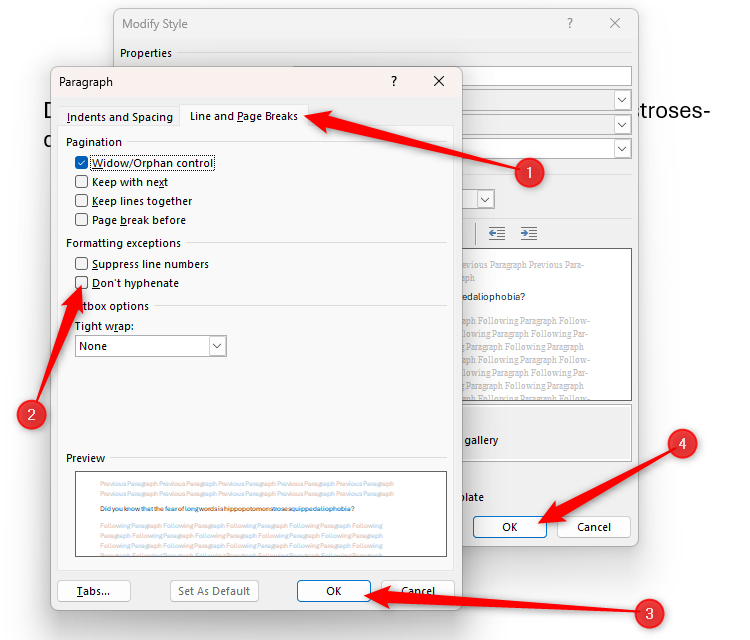
Then, click the “Format” drop-down menu at the bottom of the Modify Style dialog box, and select “Paragraph.”
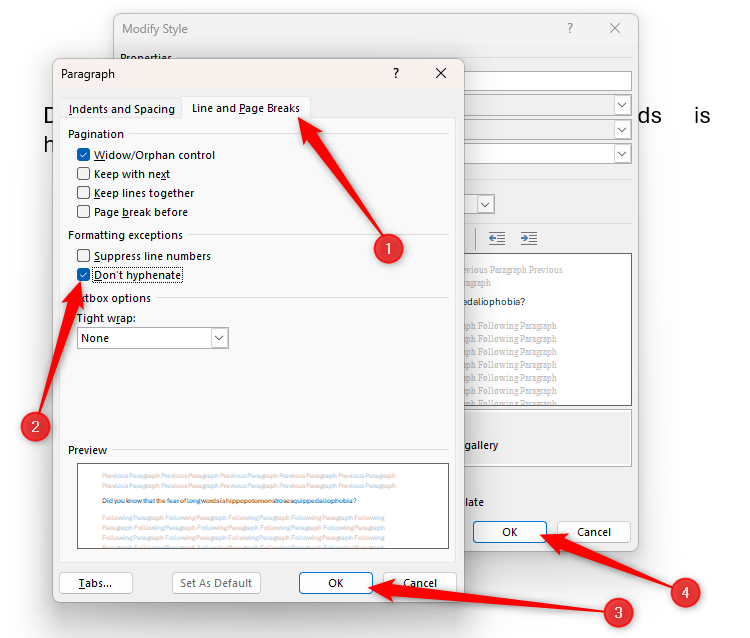
Finally, in the Line And Page Breaks tab, check “Don’t Hyphenate,” and click “OK” twice to close both dialog boxes.
Other Hyphenation Options
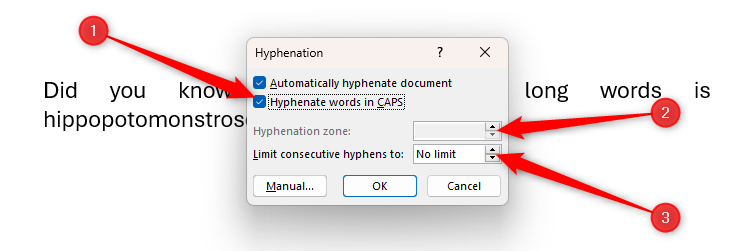
Alongside the settings I’ve already discussed, there are three more options you can adjust to ensure hyphenation works exactly as required in your document. To access these settings, after clicking “Hyphenation” in the Layout tab on the ribbon, select “Hyphenation Options.”
Then, make any necessary changes in the Hyphenation dialog box as follows:
- Hyphenate Words In Caps: This option is most relevant if you have acronyms in your document that you don’t want to be split across two lines. Uncheck this option to stop this from happening.
- Hyphenation Zone: For most, this option will be grayed out, as it’s not supported in the DOCX file format, which has been the default since Word 2007. However, if you’re using an older version of the program, the hyphenation zone allows you to define the maximum amount of space between the final word on a line and the right-hand margin before a hyphen is added.
- Limit Consecutive Hyphens To: If you have activated automatic hyphenation, there might be instances when Microsoft Word adds hyphens at the ends of two or more consecutive lines. If you think this looks untidy or makes the text more difficult to read, click the field’s “Up” arrow once to change the number to “1.”
When you’ve finished adjusting the hyphenation options, click “OK.”
What to Do if Automatic Hyphenation Isn’t Working in Microsoft Word
If you’ve checked Automatic Hyphenation in the Hyphenation drop-down list of the Layout tab on the ribbon, but Word still isn’t inserting any hyphens, take a look at these possible causes and fixes.
Cause: The Paragraph or Style Settings Are Set to “Don’t Hyphenate”
To change an isolated paragraph’s hyphenation settings, place your cursor in the paragraph, and click the Paragraph Settings dialog box launcher button in the bottom-right corner of the Paragraph group in the Home tab on the ribbon.
Next, in the Line And Page Breaks tab, uncheck “Don’t Hyphenate.” Lastly, click “OK.”
If you’re working with Microsoft Word’s styles, right-click the relevant style in the Style Gallery in the Home tab on the ribbon, and select “Modify.”
Next, click the “Format” drop-down menu at the bottom of the Modify Style dialog box, and select “Paragraph.”
Finally, in the Line And Page Breaks tab, uncheck “Don’t Hyphenate,” and click “OK” twice to close both dialog boxes.
Cause: The Spelling and Grammar Proofing Tools Are Disabled
Microsoft Word won’t hyphenate your text automatically if it isn’t constantly reviewing your work for spelling and grammar issues.
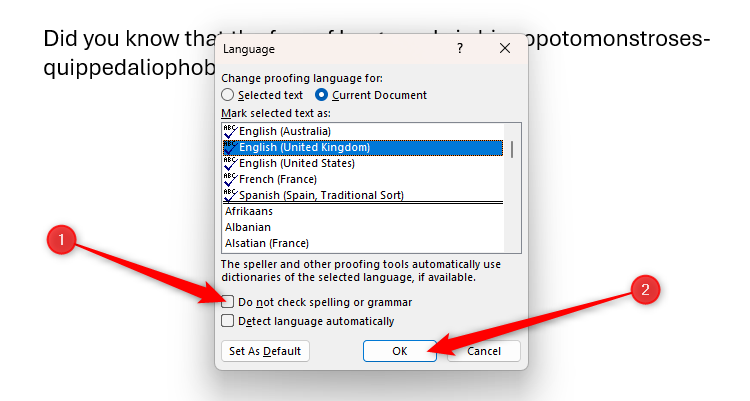
To fix this, in the Review tab on the ribbon, click the Language button. Then, click “Set Proofing Language.”
Now, in the Language dialog box, make sure “Do Not Check Spelling Or Grammar” is unchecked, and click “OK.”
Cause: Your Document Doesn’t Require Hyphens
If, after analyzing your text’s structure, syllable divisions, and spaces between words on each line, Microsoft Word doesn’t add any hyphens, there’s likely nothing to fix—your text looks great as is! However, if you still want to force a long word at the end of a line to run over to the next line, add a hyphen manually.
Adding hyphens isn’t the only way to organize and structure text in Microsoft Word. For example, you could add non-breaking spaces to keep words together on the same line, insert page and section breaks to segment your chapters, and use the program’s paragraph settings to control how sections of text are laid out and interact with each other.


